*This post was originally written January 11, 2019
_______________________________
This part of the build feels like the turning point, where the van goes from being a van, to being closer to a camper. Where the tides are changing and you can almost smell the sweet scent of the road in the air…
Part of that is that I am finally seeing the van transform before my eyes as a whole. It is looking so different these days!
The other part is that, while my departure date has been a moving target thus far, I now have a deadline. And having just crossed the threshold into a new year, everything feels fresh and re-energized.
The past few months have, in retrospect, been slow on the physical van front, but a lot has been discovered and decided behind the scenes. Progress is always being made.
Things have also been interesting as I’ve been adapting the build to the colder temperatures and shorter daylight hours of winter.
Below you will find information on the materials used, process, and challenges experienced as I installed various types of insulation and the wood studs.
Insulation
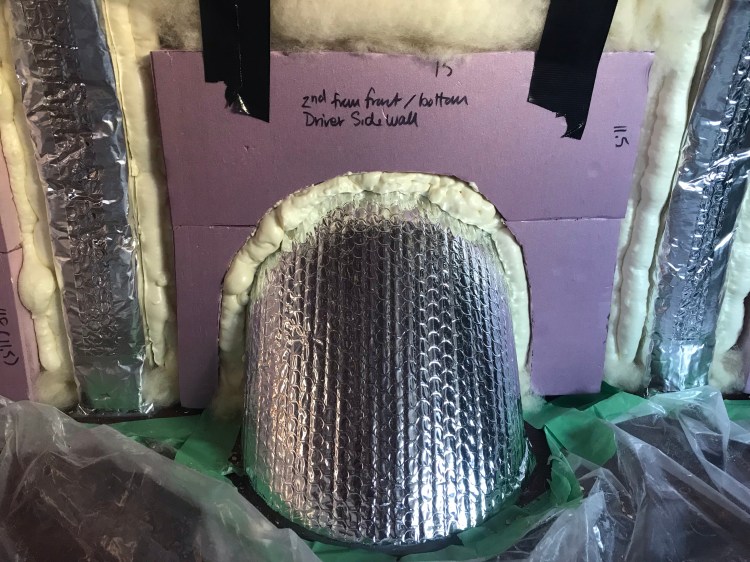
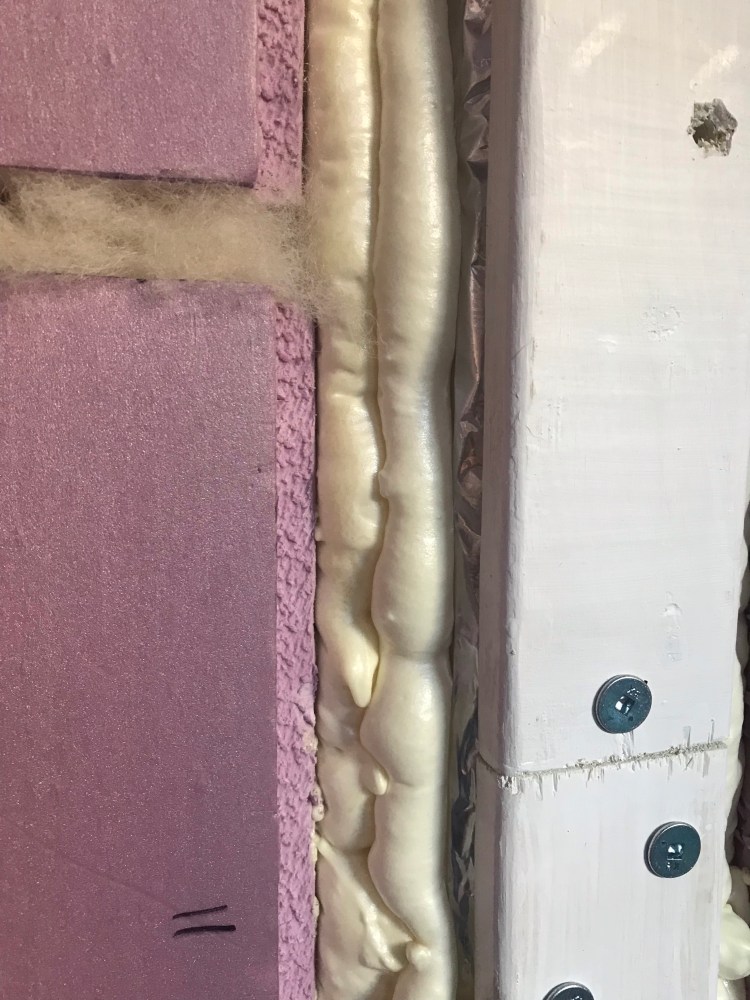
To insulate my van I chose to use a combination of XPS Rigid Foamboard, Reflectix, Havelock Sheep’s Wool, and Gaps and Cracks Spray Foam Insulation.
Extruded Polystyrene (XPS)
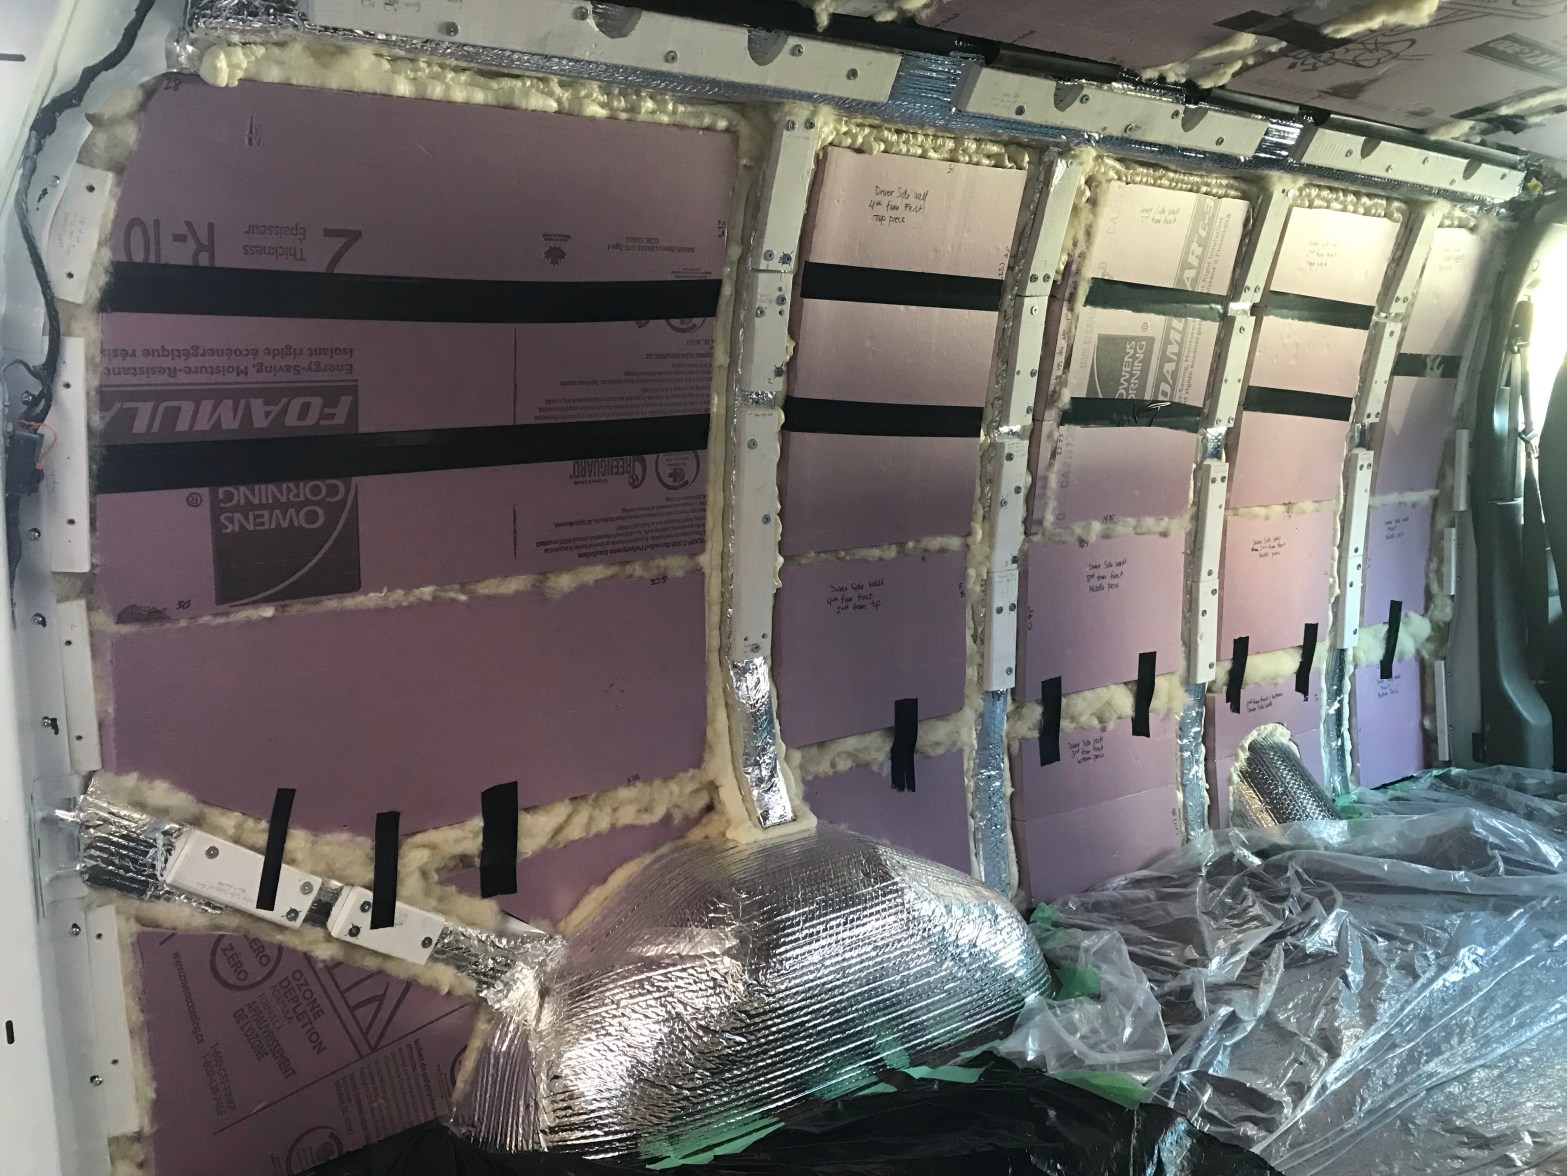
The bulk of the insulation was the Extruded Polystyrene (XPS) Rigid Foamboard Insulation (R-5.0 per inch). If you’d like to read in detail why I chose XPS you can visit my previous post on the floor installation. The gist is that I chose it for its compressive strength, resistance to moisture, and superior insulating performance over polyiso in cold weather. Plus, it’s easy to find in stores.
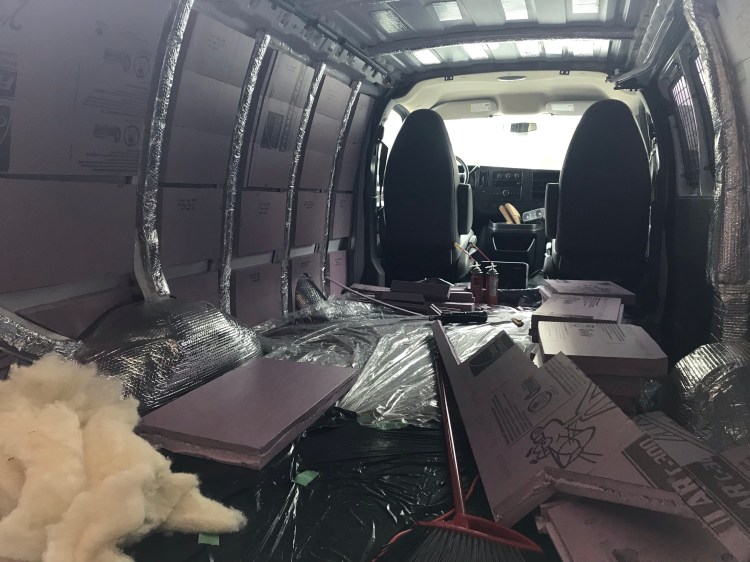
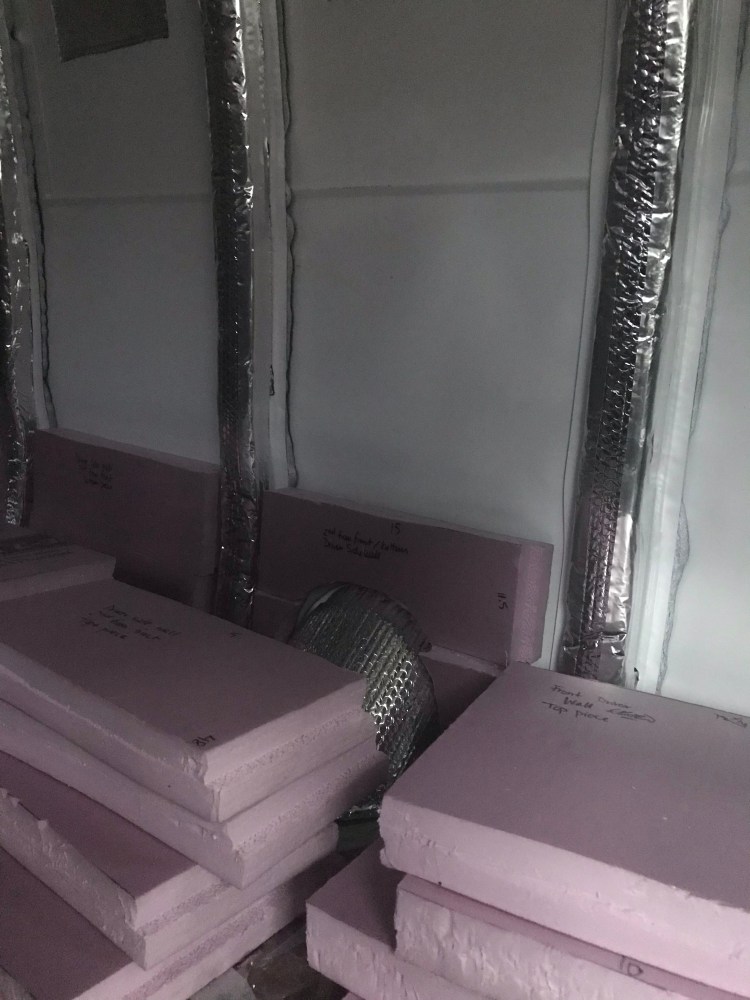
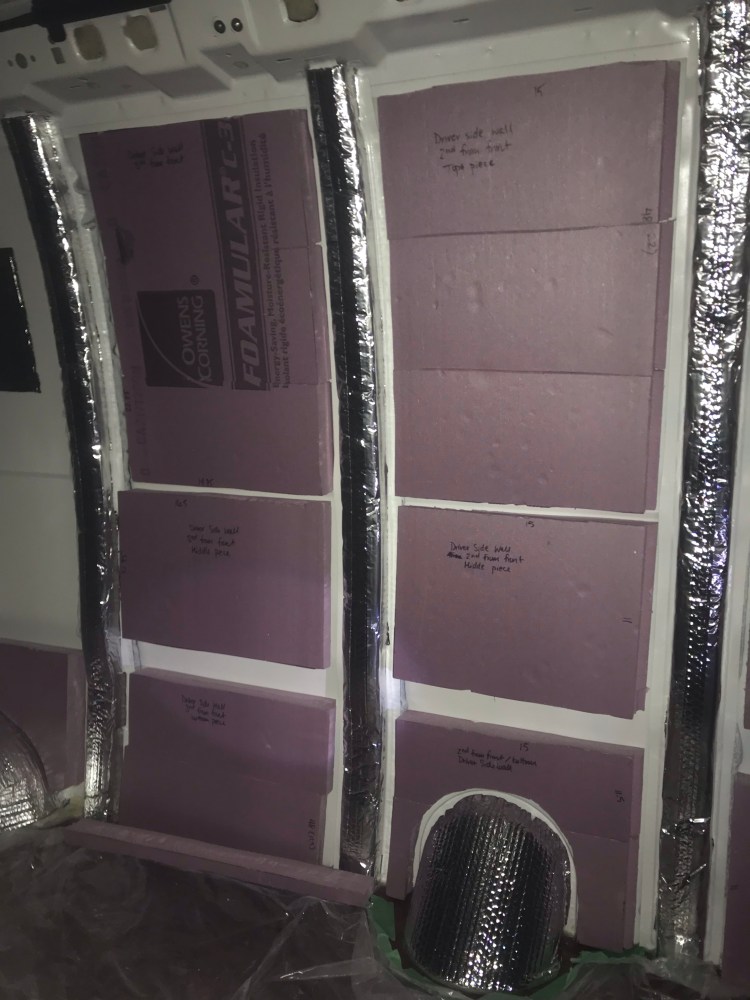
I used 2″ XPS for the walls and ceiling (also see flooring post for process of putting down 1/2″ XPS on the floor). This might seem like a lot of insulation, but I figured I might as well since I had 2-3 inches of room from the walls/ceiling to where the top of the studs would lie on the van ribs.
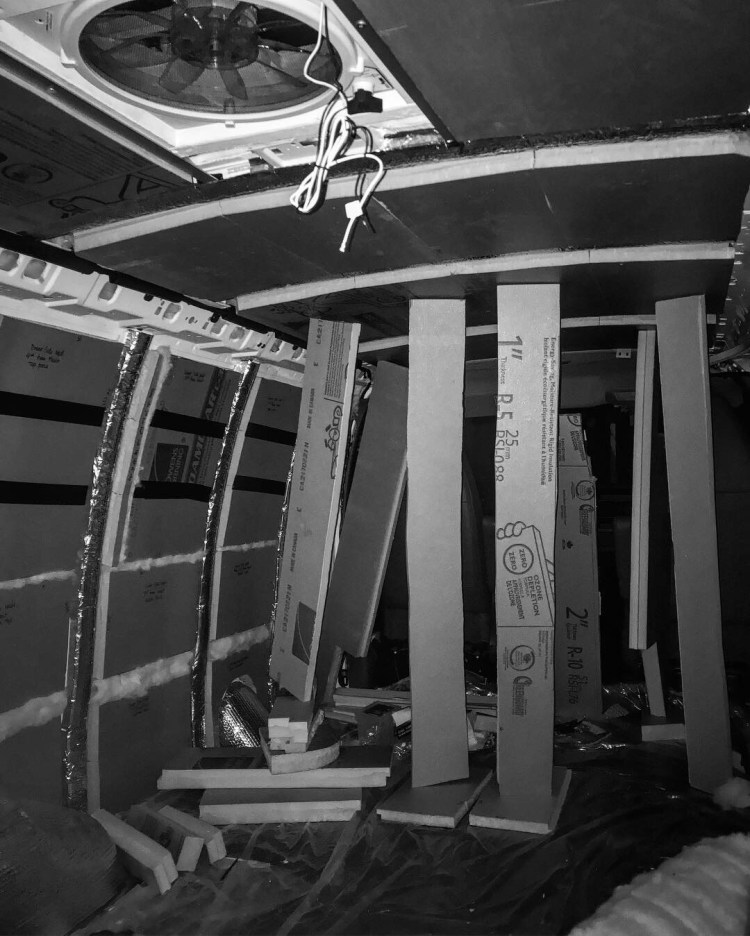
One downside to the thickness of the foam board was that it is not flexible. With the curves of the van, this was something I had to work around. One way to incorporate flexibility would be to stack 1/2″ sheets of XPS on top of each other. That way you could potentially use single pieces per whole sections between ribs. Once you get to the 1″ thickness of the XPS you lose flexibility of the foam board. In my case I cut the 2″ XPS into small pieces.
I didn’t do any templates for the XPS. Instead, I took measurements for each section, wrote them down, then measured/ cut everything at once with a tape measure and utility knife. I will say, cutting through 2″ XPS with a utility knife was a bit of a pain. The knife did not cut all the way through so I had to measure and cut on both sides as opposed to just one side – twice the work.
I kept track of where each piece went by writing the dimensions and placement on each piece of foam board. I then did a dry fit and adjusted any pieces that weren’t fitting. Once I was satisfied with the dry fit I stacked all of the pieces next to their placements and got to work on securing them.
I used Gorilla Construction Adhesive here. It would have been easier and less time consuming could I have used 3M 90 Spray Adhesive (which I could have used with polyiso) because it cures much quicker – but unfortunately the acetone content eats away at the foam. I had done a test with Gorilla Construction Adhesive and found it was very strong and so I didn’t need to use much to adhere the XPS to the van walls and ceiling. If you’re curious about adhesive options for rigid foam insulation, here‘s a great video.
Also of note is that at the time of application the temperatures here in Canada were in the single digits. I did my best to work with the season and use the warmer days to apply any adhesives. While I did have a heater inside the van to warm up the internal temperature, the metal temperature was dictated by the outdoor temperatures and I was uncertain as to how that would affect the curing of my adhesive. Luckily when I checked the Gorilla website the tech specs on their construction adhesive stated an application temperature range of -40 to 38 degrees Celsius (ideally above 10 degrees).
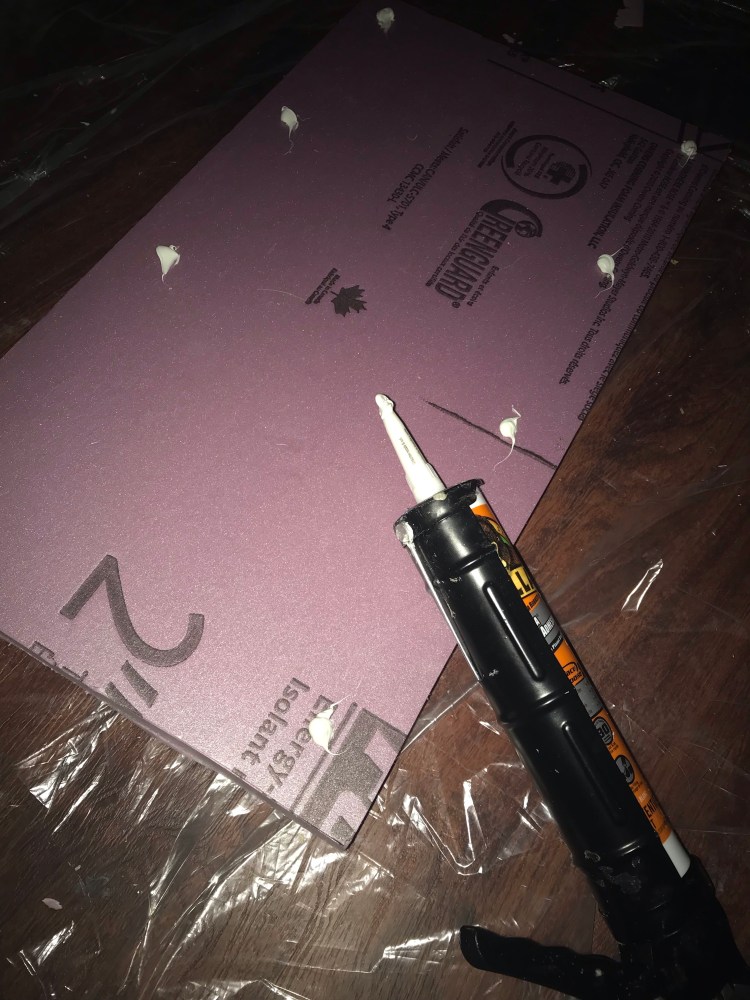
The construction adhesive comes out in a caulk gun and takes hours to fully cure. This was another reason why having smaller pieces of XPS was beneficial, because the bigger the piece, the more weight pulling it away from the metal surface. I had a few larger wall pieces sliding out of place on me and had to keep checking on them as I went, pushing in on them to make sure they were tight to the wall.
For the ceiling I used makeshift props to hold each piece in place. After leaving the XPS overnight to cure I found everything was staying, and felt very secure!
Once all of the XPS was secured in place I went around to any pieces with butt edges and taped the seams with Gorilla tape.
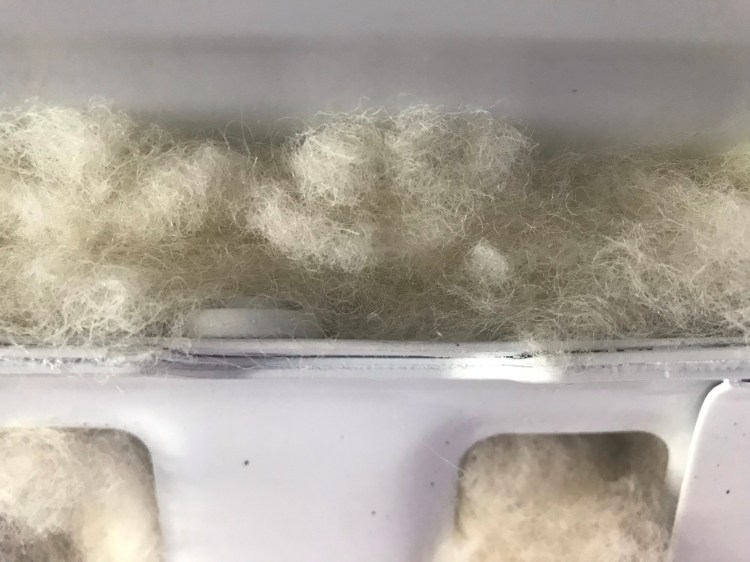
Havelock Sheep’s Wool
I needed some form of insulation that I could get into small spaces. I wanted to get into the van ribs and desired an alternative to fiberglass. Enter: sheep’s wool.
There are several reasons why I shied away from using fiberglass. While it’s cheap and popular (used in building houses), there are downsides. Mainly, it’s annoying to work with (makes your skin itch and airborne particles are easily inhaled and cause issues in the respiratory tract), you would need to contain it so that it’s sealed off (e.g.,put it in garbage bags – tough to stuff into van ribs – as over time and with the vibration of the van it would degrade and release particles into the air) – which adds more work, and it absorbs moisture which means you could have moisture sitting in your walls contributing to mold or rust.
Sheep’s wool is a natural alternative to fiberglass that can be used in hard to reach nooks, with a comparable R-3.6 (batt) to R-4.3 (loose fill) per inch. It is natural and non-toxic, does not off-gas, and actually acts as an air filter. It doesn’t mold (natural keratin suppresses mold and mildew) and helps to reduce moisture and condensation by absorbing it. Sheep’s wool also serves as a sound barrier, absorbing sound and converting it to heat (which in turn can act against water condensation). And it does not support a flame below 590 degrees Celsius. You can find more information here.
I’ve heard that some people have a hard time getting their hands on sheep’s wool, and it is more expensive. I was lucky in that I only needed a small amount and Jamie at Performance Haus was extremely helpful!
I ended up sticking the sheep’s wool into all the ribs except the ceiling ribs – those had no holes big enough for me to stick the wool into – being careful not to overstuff which can decrease the R-value. It also went into the horizontal spaces between the XPS on the walls and in any spaces in the ceiling (between XPS and ribs and around the edges).

Since it is currently winter here in Canada, the metal in the van is cold to the touch. I was adjusting some of the sheep’s wool and was fascinated to find that the side of the wool touching the metal was cool to the touch, whereas the opposite/ inner side was not – insulation in action!
Why not just use spray foam in all remaining crevices, you ask? Well, I have a theory surrounding condensation. Like I always say – plan for the worst, hope for the best. So – my theory concerns whether or not condensation will form on the inside of the van walls or ceiling/ behind the insulation. My thought process is that when I’m in a hot climate and the inside of the van warms up, then the temperatures drop overnight (say I’m in the desert) – the metal walls will quickly become cold while the air in the van may still be warm. What if this warm air condenses on the van walls inside the van and behind the insulation? I certainly do not want this moisture getting trapped (one reason why I did not use a vapour barrier).
So – what if I leave paths for any possible moisture to drain? I’ve sealed off the edges of the floor so that water would drain onto the floor and not get trapped under it. The adhesive on the XPS is spaced out (dots) so as to not block drainage (with the curves of the van the XPS does not always lie flat). I used spray foam in the vertical spaces up and down the walls between XPS and ribs. Then I used the sheep’s wool in the horizontal spaces between XPS pieces so that any condensation can pass through – or be absorbed, pulled away from the metal wall (preventing rust), and later released.
There are several ways that moisture could get behind the walls and insulation – ventilation is going to be my main combative strategy, but just in case – I came up with a way that I think the insulation might cope.
Next, I thought about using the sheep’s wool inside of the van doors, but I get the van treated with Krown rust control annually and they spray inside the doors so I am going to opt for using Reflectix on the doors instead.
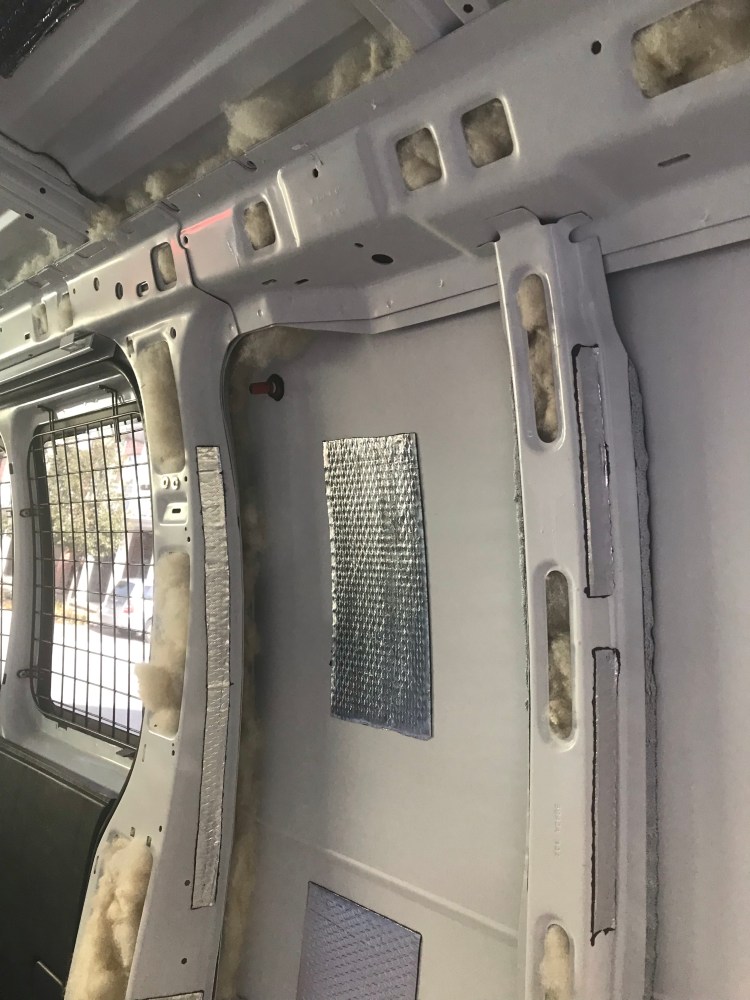
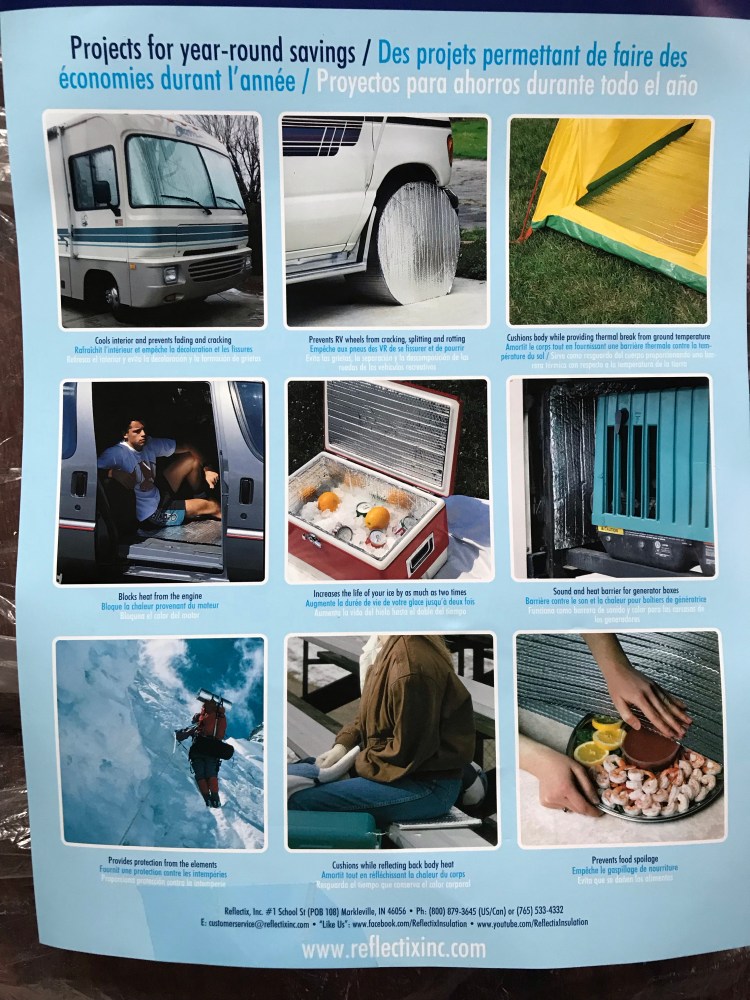
Reflectix
It is very important that if you want optimal performance out of your Reflectix – you use it correctly.
Basically, Reflectix (R-3.7) is bubble wrap painted with a reflective coating which acts as a radiant heat barrier, and it needs air space in order to do its job. This means that if you’re putting it directly between two materials (e.g., van metal wall and foam board) – you’re no longer dealing with radiant heat, you’re dealing with conduction. You will only get about R-1.0 out of your Reflectix with no air space, which probably isn’t worth the money paid for it.
As long as you have air space, Reflectix works great! It’s perfect for use as window covers (which I will be doing later on in the build). It would also be great inside door cavities (which I will also be doing later).
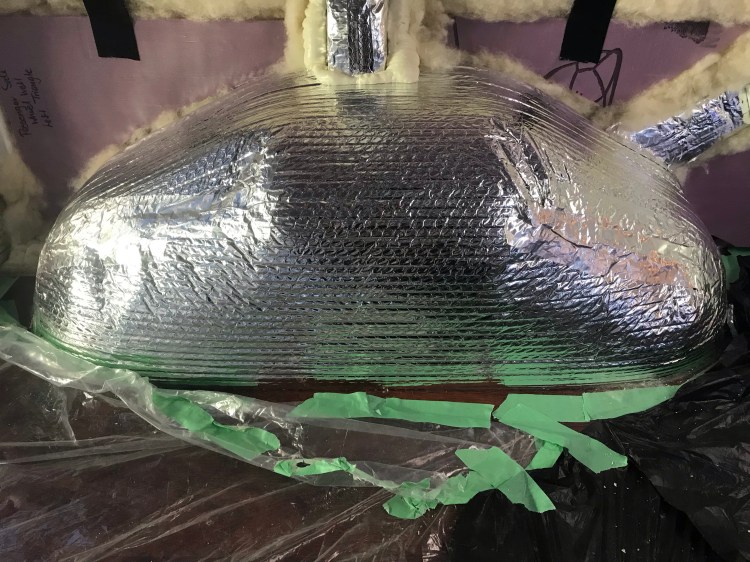
I used 3M 90 spray adhesive to adhere Reflectix to the wheel wells and fuel pipe (it really is a shame I couldn’t use the 3M more – it works so well! Maybe too well if you plan on disassembling at some point… as it will pull up the paint in your van).
I also used foil tape to attach Reflectix over the van ribs. While the ribs will be partially covered when I attach the studs, there will be spaces around the studs where air space will remain. And I’ll still have about an R-1.0 from the Reflectix and R-1.0 from the studs. If I had put the wood directly on the metal ribs I am certain there would be thermal bridging. Even if I put spray foam between the studs, I’d have to cut away excess foam and there would be a lesser R-value at the studs.
Prior to taping the Reflectix to the ribs, I made templates for the ribs. As the ribs have holes all over the place, I would need a way to know where I can drill and screw in the studs.

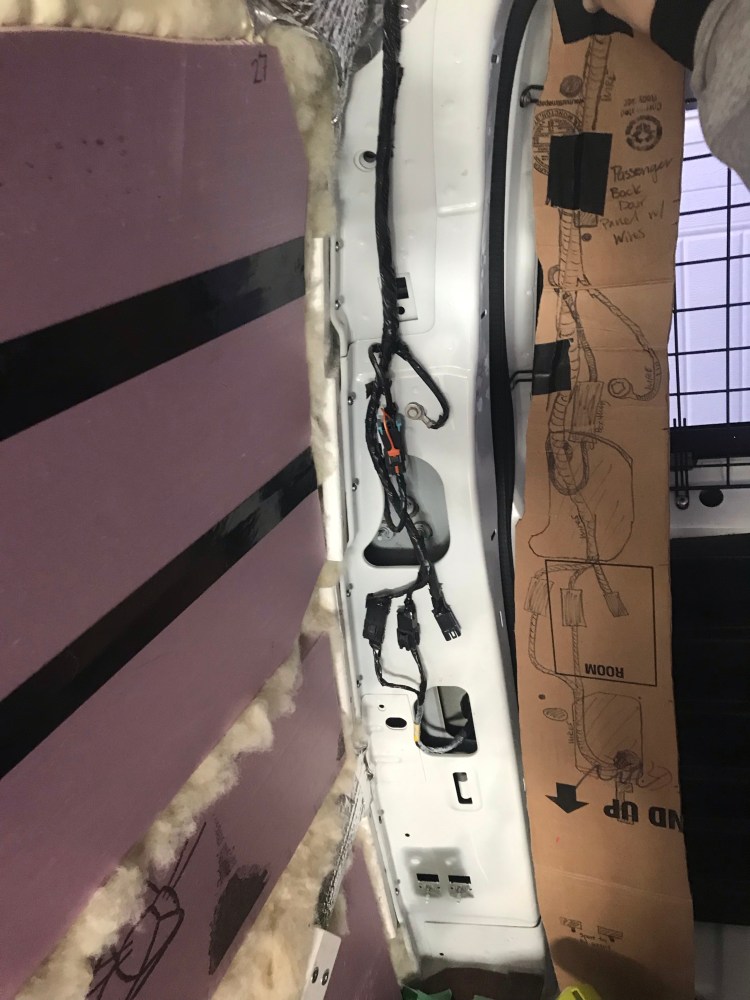
I also put Reflectix around the van ribs that lined the doors. I had to be especially precise on the rear door ribs as this is where the brake light wiring is. I made templates here, too, to indicate where there are holes and wires.


Here are some more uses for Reflectix:
Spray Foam
You can use spray foam for your entire van with a professional spray kit or by hiring a professional for the application. This would be neat, but is more pricey. Spray foam purchased by the can and used in conjunction with other forms of insulation is a more economical route.
Closed cell spray foam has an R-value up to R-6.5, is waterproof, has an elasticity to it which allows for movement, acts as a sound dampener, and can also work as a (light) adhesive.
Side note – closed cell vs. open cell spray foam. Open cell spray foam is lightweight, pliable, has higher expansion, is moisture permeable (actually a plus in houses near roofing as it will become discoloured and tell you where a leak is, whereas closed cell might allow a leak to build up and cause more damage before it is detected), and has better sound dampening abilities. Closed cell spray foam is dense, rigid, has less expansion, is waterproof, and has a higher R-value per inch.
I actually waited to apply the spray foam until after I had attached the studs to the ribs, since I was mainly going to be putting it in between the ribs and XPS. I figured the spray foam might expand so much that it could obscure the spaces where the studs were going to go if I did it first.
This step was pretty easy – and I always find spray foam to be fun to use! My inner child loves it. I donned my protective glasses, respirator and gloves, and got to work. I went over the gaps twice as they were wider than the recommended 1 inch by Great Stuff Gaps and Cracks. I focused on the vertical gaps on the walls between the ribs and XPS.
I also considered how the looming winter temperatures might affect this application. I couldn’t find any information on application temperatures, not on the canisters or the Great Stuff website. So I went for it, again taking advantage of warmer days and using my portable heater in the van. I feel that it worked out fine. The only concern might be if the foam continues to expand once we hit summer with the warmer temperatures, but I’ve got a good amount of clearance to where the walls will be, so I’m not worried about it coming out of the woodwork.
Note: if you can, get the Gaps and Cracks with the “smart dispenser”. They’re just releasing this now as I post this, so when I bought my spray foam it was just the regular dispenser, which turned out to be a royal pain. I avoided using the foam whenever I needed it, instead waiting to try and use it for all applications at once – otherwise the dispenser would become sealed with the foam and you’d waste whatever was left in the canister. Covering the dispenser in cling wrap didn’t make a difference either. I had purchased in bulk, so a few times I took a new dispenser from an unopened can and put it on a used can with product still in it. In total I probably used 3 or 4 cans (for the floor and walls), but I still have a few left over – without dispensers.
Studs
This section of the build was a lot more time consuming than anticipated (I could say that about pretty much every part of the build… but this phase moreso!).
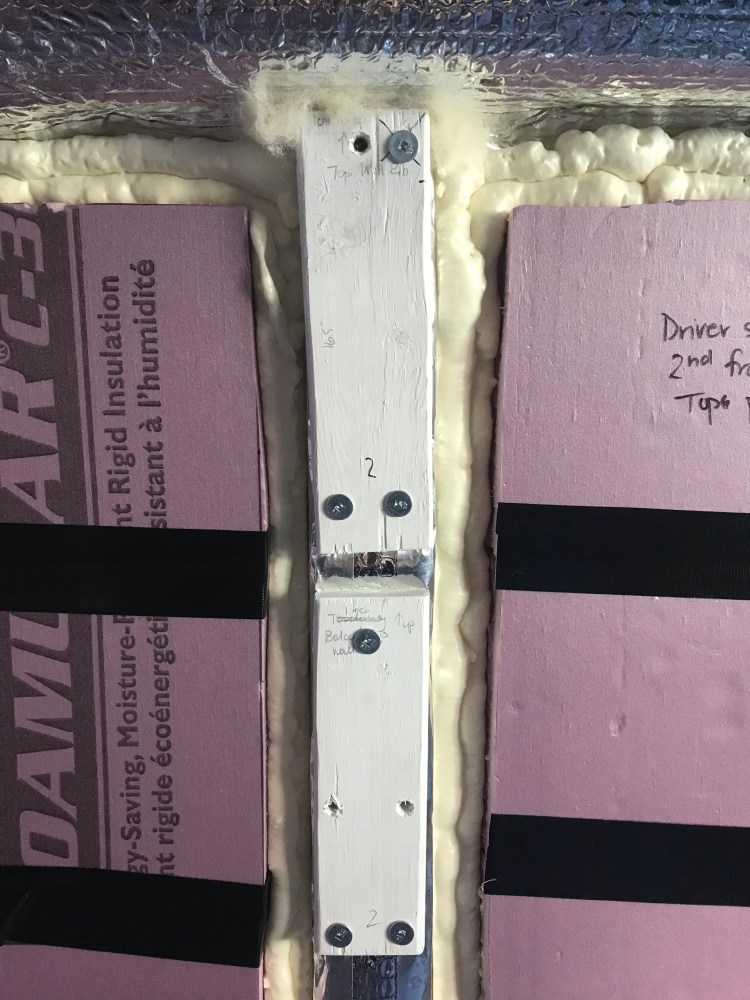
After making my cardboard templates for each of the van ribs I measured out the appropriate lengths of wood needed for each rib. Because the ribs were slightly curved I needed to use several shorter lengths of wood for each rib instead of one long stud per rib. I measured out these lengths on 1×3 lumber and got to cutting with my jig saw (wearing gloves, glasses, and dust mask). I sanded down the ends of each stud, then treated the wood with Concrobium mold control. This was left to dry for 24 hours and followed by a coat of mold resistant paint.
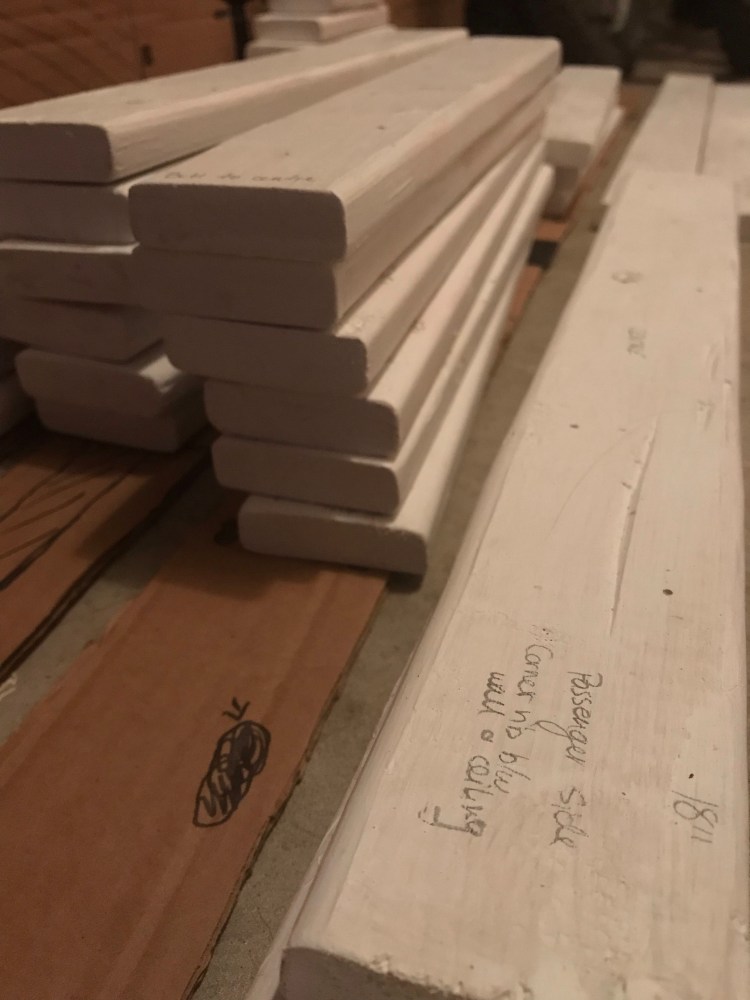
I had written the lengths on each stud and used this to group the studs with their related template so I could keep track of where they belonged. I then lined the studs up next to their templates and marked the placements for screws (around all those holes in the ribs). I drilled clearance holes here as I did not want my screw threads to bite into the wood. I also countersunk the holes.

Trial and error and learning are all part of the process, so there were holes that didn’t line up and studs that needed to be cut down to better accommodate the curve of the ribs (which also meant more mold proof painting).
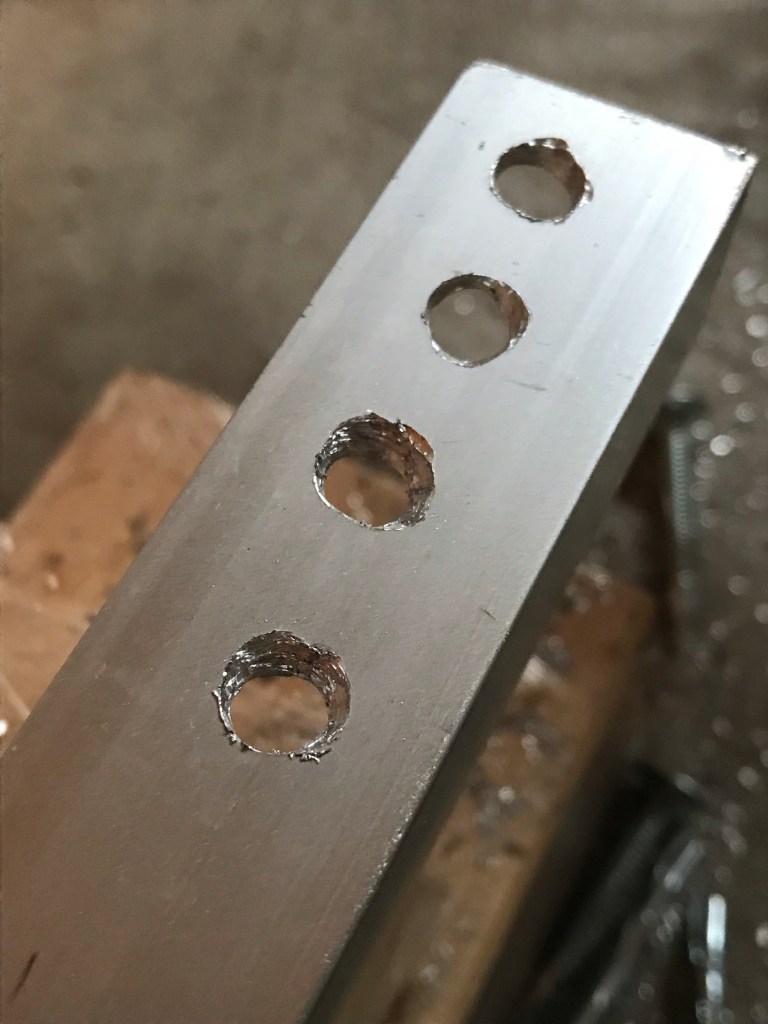
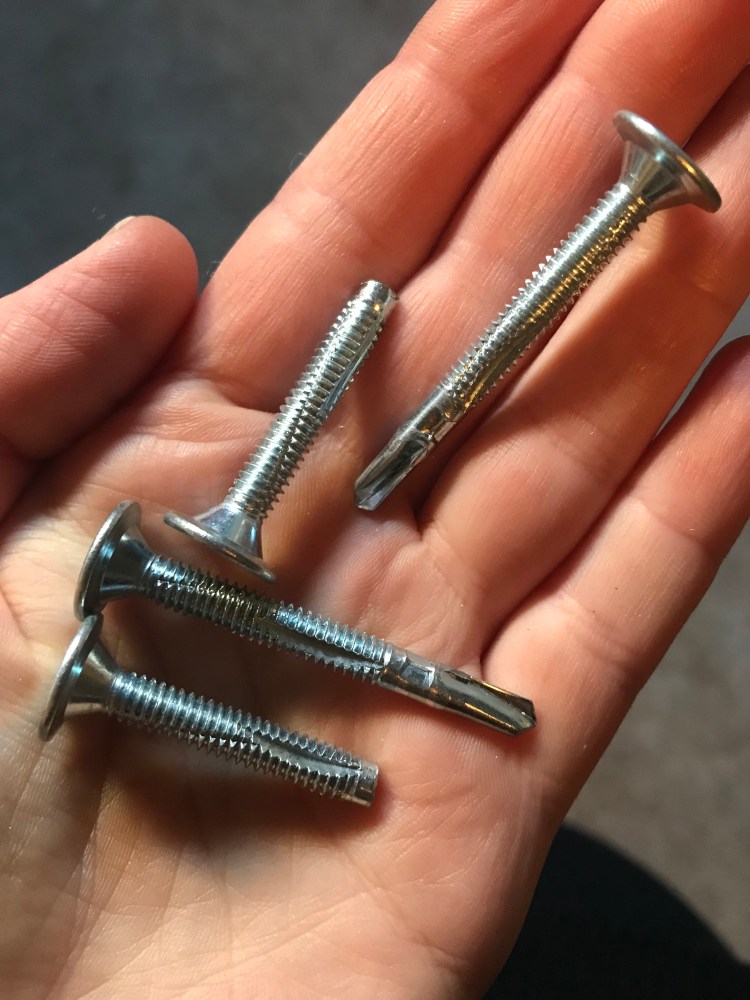
Another issue I had was with the Tek screws I was using. These are great structural screws but they have flanges right before the threads. These are wood to metal so the idea is that the flanges will create a clearance hole in the wood and when the flanges hit the metal they will snap off, the drill head will create a pilot hole in the metal, and then the screw will cut its own threads. Which is wonderful in theory – but they didn’t work as advertised and the flanges did not break off. In fact, they widened the pilot holes in the metal so that the threads had nothing to bite into!
I was frustrated. But this was another opportunity to get creative and resourceful. What I ended up doing was drilling a bunch of pilot holes into an extra aluminum angle bar I had lying around. I found that by drilling the Teks into the holes at an angle I could snap off the flanges. The process widened the holes until they no longer worked, at which point I’d move on to the next hole.
I also had to reconfigure my plans for the ceiling screws. I was using 2″ Teks for the wall ribs, which gave plenty of clearance between the tip of the screws and the outer van walls. But the ceiling ribs were narrower, so I needed to use a shorter screw. Initially I had planned on using the 1.5″ Teks, but this was before I had decided on adding the Reflectix layer to the ribs. This thin layer of insulation was enough to make it so that the threads of the 1.5″ Teks would not reach the backing metal. I also could not use the 2″ Teks because they were still too long. What I really needed was a 1.5″ screw that was threaded to the end instead of having a drill piece like the Teks.
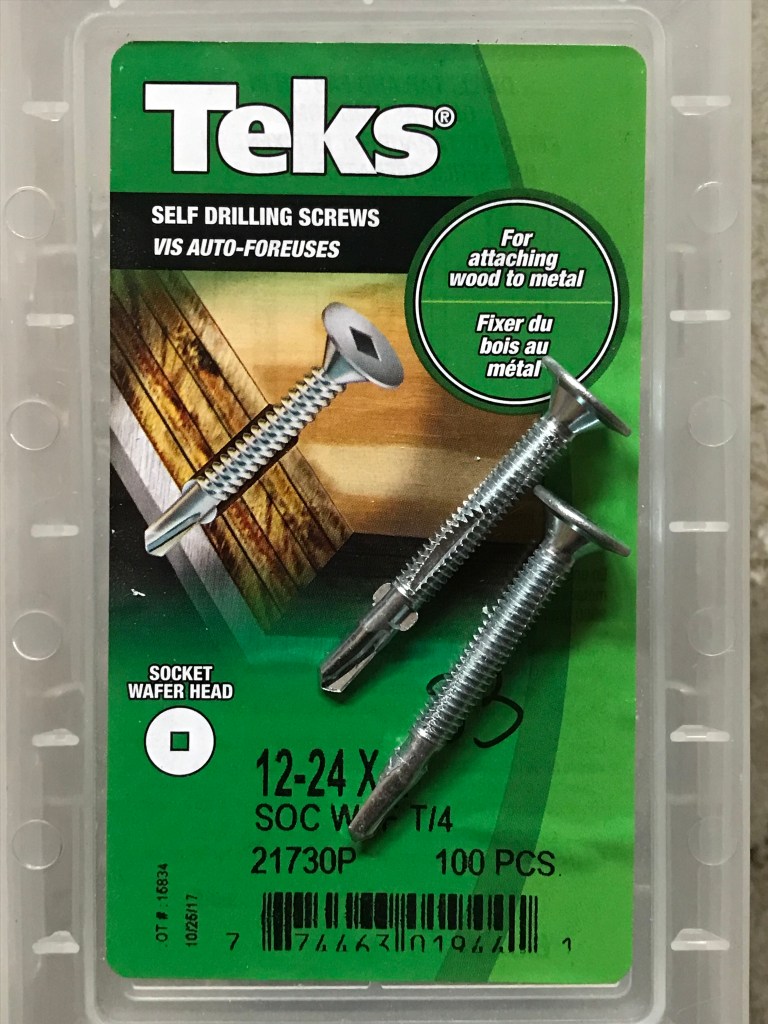
Fasteners are intricate little devices. I spent hours researching this. I think it’s one of those things you could never stop learning about. I decided on what I needed: 12-24 x 1.5″ flat head thread cutting screws. So that’s a 12 gauge, 24 TPI (threads per inch), 1.5″ long screw that cuts its own threads into your material. I learned that there is a difference between thread-forming (in softer materials when the fastener displaces the material to form threads) and thread-cutting (in harder materials when the fastener actually removes / cuts out part of the material in order to form threads). 12 gauge was what I’d been using on the walls and felt strong to me. Based on my research I wanted finer threads, such as the Teks I’d been using, so about 24 TPI. 1.5″ was long enough to get through to the metal rib, without hitting the exterior van roof. And of course a flat head that would sit flush since walls and ceiling would go on top.
Unfortunately – almost nobody carries these screws. Typical hardware stores carry sheet metal screws, which are thread-cutting but have coarse threads, and machine screws, which have finer threads, but are not thread-cutting. Even the specialty construction store I called didn’t have these screws – except in a hex head, which wouldn’t work since I need the screws to sit flush. My last resort was Amazon. And I found what I was looking for – but there were no reviews, which is usually what I base my Amazon purchases on. Were there no reviews because it wasn’t a good product or because it was so specific that not many people use it? I was wary.
But I did have another option… I could cut off the ends of my 2″ Teks. These Teks were too thick to cut with a crimping tool, but I could potentially use a hack saw. Not wanting to invest in a new tool (that I might only use once) if I didn’t have to, I tried using some of the tools I already had. But nothing worked, so I gave in and bought a hack saw. It was back breaking work – but it was a success! Since I didn’t own a vise to hold the screws, I drilled a hole into a 2×4, stuck each screw into the hole, sat on the 2×4, and got to sawing. And if you’re having trouble picturing what that looked like – it was awkward. Fifty screws later…
First I attached the studs to the wall ribs. I held each stud in place and got a start on the metal pilot holes by drilling through the existing stud clearance holes, which helped keep the drill from wandering along the metal surface. Since I was also drilling through Reflectix I found that a few seconds into drilling a piece of Reflectix would wrap around the tip of the drill bit, “dulling” it, so I’d have to pull the plastic off before continuing to drill.

It was through this experience of drilling through hard steel that I learned a very important lesson – the value in a good drill bit. Black oxide is what came with the drill bit/driver kit I had initially purchased before starting the build. And while the black oxide bits can be used for metal drilling, they are not great with hard metals. Cobalt on the other hand is wonderful! And I can definitely attest to the difference between black oxide and cobalt. That being said, any bit dulls with use. There’s nothing like a brand new cobalt drill bit… and I went through a few of them during this process.
Drilling through metal and attaching the studs was a serious test of patience. It was also pretty rough on the body, especially when drilling into the ceiling.
Once I finished drilling a pilot hole I applied medium strength threadlocker to my screw and drove it in. I actually forgot about this until I was about halfway through attaching studs, so I went back, carefully took out these screws, applied the threadlocker, and gently drove them back in. A few screws did strip their threads on extraction, so a few new screw holes were made. I wanted to have the added stability of threadlocker to keep the screws from coming loose under the constant vibration of the van, but I only used the blue compound – which can be removed – for added security, not the red which is considered a permanent adhesive.
To finish off the stud installation, I also made some 2×1 studs for the “lips” of metal on the edges of the walls – behind the driver seat, surrounding the back door, and beside the side door – as well as for the ends of the roof. These will serve as end-piece attachments for the walls and ceiling.
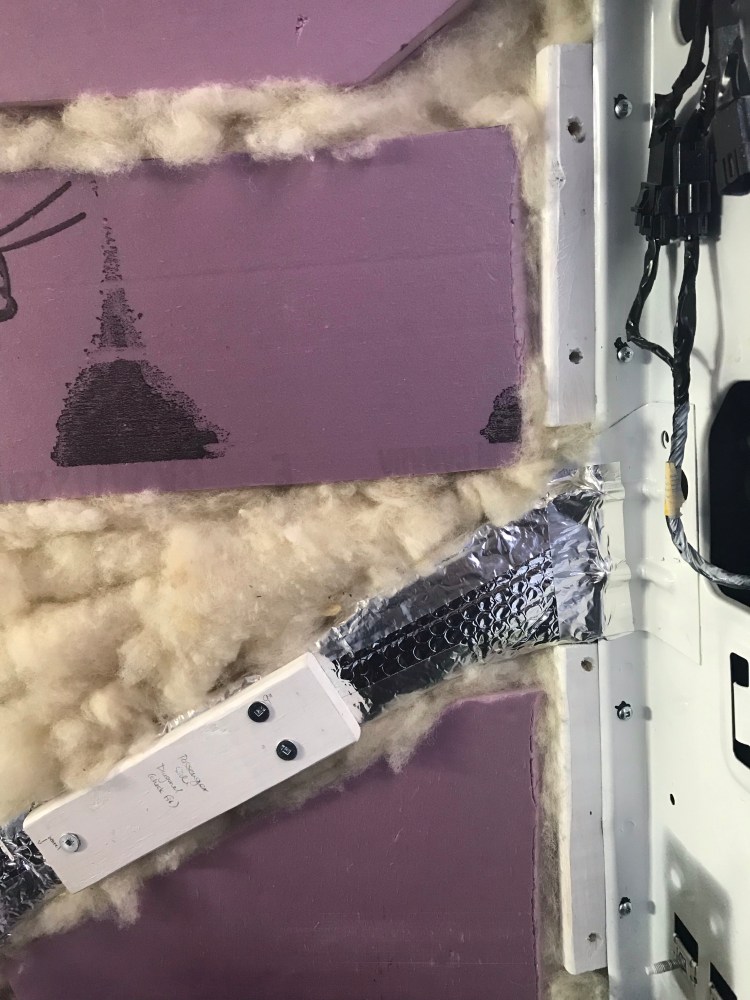
I also altered the studs that went below the wiring for brake lights along the driver side ceiling. The holders for the wiring were connect to the ribs in a way that made it so the wood would not lie flat, so I cut out some “half moons” to go around, as you can see below.
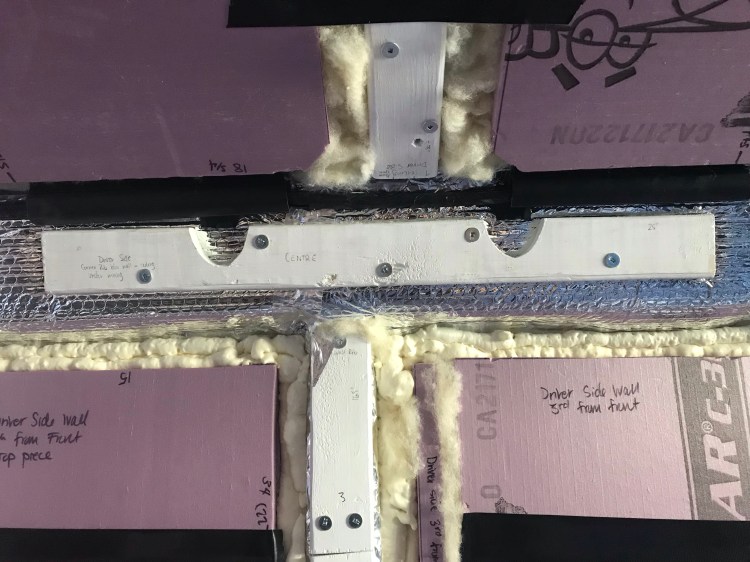
In total, I drilled about 180 holes through hard steel, placing studs on wall and ceiling ribs as well as on the lips at the ends of the roof and walls, doing my best to work with the curve of the van and make things as level as possible (though I’m sure I’ll need to use shims in some areas).

Et voila! Another phase of the build down and another step closer to the finish line.
As per usual, I’m ending this post with some music. Ever since embarking on this van life journey I’m always noticing cargo vans. Here’s a record that features a van on the album cover. It’s also a kick ass band from Ontario.
Later,
Kat
Copyright © Chronic X-Roads 2020

One thought on “Van Build #5: Insulation & Studs”